How to Load Java Script Again in Footer
Client-side storage
Mod spider web browsers back up a number of ways for web sites to store data on the user's computer — with the user'south permission — so recall it when necessary. This lets yous persist information for long-term storage, save sites or documents for offline apply, retain user-specific settings for your site, and more. This article explains the very basics of how these work.
Customer-side storage?
Elsewhere in the MDN learning area we talked virtually the divergence betwixt static sites and dynamic sites. Nearly major modern web sites are dynamic — they store data on the server using some kind of database (server-side storage), so run server-side code to recollect needed information, insert it into static page templates, and serve the resulting HTML to the customer to exist displayed past the user's browser.
Client-side storage works on like principles, only has different uses. It consists of JavaScript APIs that allow yous to shop data on the customer (i.eastward. on the user's motorcar) and and so retrieve information technology when needed. This has many singled-out uses, such as:
- Personalizing site preferences (e.g. showing a user's option of custom widgets, color scheme, or font size).
- Persisting previous site activeness (eastward.chiliad. storing the contents of a shopping cart from a previous session, remembering if a user was previously logged in).
- Saving data and avails locally so a site will be quicker (and potentially less expensive) to download, or be usable without a network connectedness.
- Saving spider web application generated documents locally for use offline
Often client-side and server-side storage are used together. For example, you lot could download a batch of music files (perchance used by a spider web game or music actor application), store them within a client-side database, and play them equally needed. The user would but have to download the music files in one case — on subsequent visits they would be retrieved from the database instead.
Note: There are limits to the corporeality of data you can store using customer-side storage APIs (possibly both per individual API and cumulatively); the exact limit varies depending on the browser and possibly based on user settings. Meet Browser storage limits and eviction criteria for more information.
Old school: Cookies
The concept of client-side storage has been around for a long time. Since the early days of the spider web, sites have used cookies to shop information to personalize user experience on websites. They're the earliest form of customer-side storage unremarkably used on the web.
These days, there are easier mechanisms bachelor for storing customer-side data, therefore nosotros won't be teaching you how to use cookies in this commodity. All the same, this does not mean cookies are completely useless on the modern-day web — they are still used commonly to shop information related to user personalization and state, e.thou. session IDs and access tokens. For more data on cookies see our Using HTTP cookies article.
New school: Web Storage and IndexedDB
The "easier" features we mentioned above are as follows:
- The Spider web Storage API provides a mechanism for storing and retrieving smaller, information items consisting of a proper name and a corresponding value. This is useful when you lot just need to store some simple data, like the user'south name, whether they are logged in, what colour to use for the background of the screen, etc.
- The IndexedDB API provides the browser with a complete database organisation for storing complex information. This can exist used for things from complete sets of customer records to even circuitous data types like audio or video files.
You'll learn more than about these APIs below.
The Cache API
The Cache API is designed for storing HTTP responses to specific requests, and is very useful for doing things like storing website assets offline so the site can subsequently be used without a network connection. Cache is ordinarily used in combination with the Service Worker API, although information technology doesn't have to be.
Use of Enshroud and Service Workers is an advanced topic, and we won't be covering information technology in great item in this article, although nosotros will evidence an example in the Offline asset storage section below.
Storing simple data — web storage
The Web Storage API is very piece of cake to use — you shop simple name/value pairs of data (limited to strings, numbers, etc.) and recollect these values when needed.
Basic syntax
Let'south testify you how:
- Kickoff, go to our web storage blank template on GitHub (open up this in a new tab).
- Open up the JavaScript console of your browser's developer tools.
- All of your web storage information is contained within two object-like structures inside the browser:
sessionStorageandlocalStorage. The commencement 1 persists data for every bit long as the browser is open (the information is lost when the browser is closed) and the 2nd i persists data fifty-fifty after the browser is closed and and so opened once again. Nosotros'll use the 2d one in this commodity as it is more often than not more useful. TheStorage.setItem()method allows you to relieve a data particular in storage — it takes 2 parameters: the name of the item, and its value. Try typing this into your JavaScript panel (modify the value to your ain name, if y'all wish!):localStorage. setItem ( 'name' , 'Chris' ) ; - The
Storage.getItem()method takes one parameter — the name of a data item y'all desire to retrieve — and returns the item's value. Now blazon these lines into your JavaScript console:Upon typing in the second line, you should run into that thelet myName = localStorage. getItem ( 'name' ) ; myNamemyNamevariable at present contains the value of thenamedata item. - The
Storage.removeItem()method takes one parameter — the proper name of a information item you want to remove — and removes that item out of spider web storage. Type the following lines into your JavaScript panel:The 3rd line should at present returnlocalStorage. removeItem ( 'name' ) ; myName = localStorage. getItem ( 'proper noun' ) ; myNamecypher— thenameparticular no longer exists in the web storage.
The data persists!
1 key characteristic of web storage is that the data persists betwixt page loads (and fifty-fifty when the browser is close downward, in the case of localStorage). Let's look at this in action.
- Open our spider web storage blank template once more, just this time in a different browser to the 1 y'all've got this tutorial open in! This will brand it easier to deal with.
- Blazon these lines into the browser's JavaScript console: You lot should see the proper name item returned.
localStorage. setItem ( 'name' , 'Chris' ) ; permit myName = localStorage. getItem ( 'name' ) ; myName - At present shut down the browser and open it up again.
- Enter the post-obit lines over again: Yous should run across that the value is all the same available, even though the browser has been airtight and then opened again.
let myName = localStorage. getItem ( 'name' ) ; myName
Split up storage for each domain
There is a separate data store for each domain (each carve up web address loaded in the browser). You volition see that if yous load two websites (say google.com and amazon.com) and try storing an particular on one website, it won't be available to the other website.
This makes sense — you can imagine the security issues that would arise if websites could see each other's data!
A more involved case
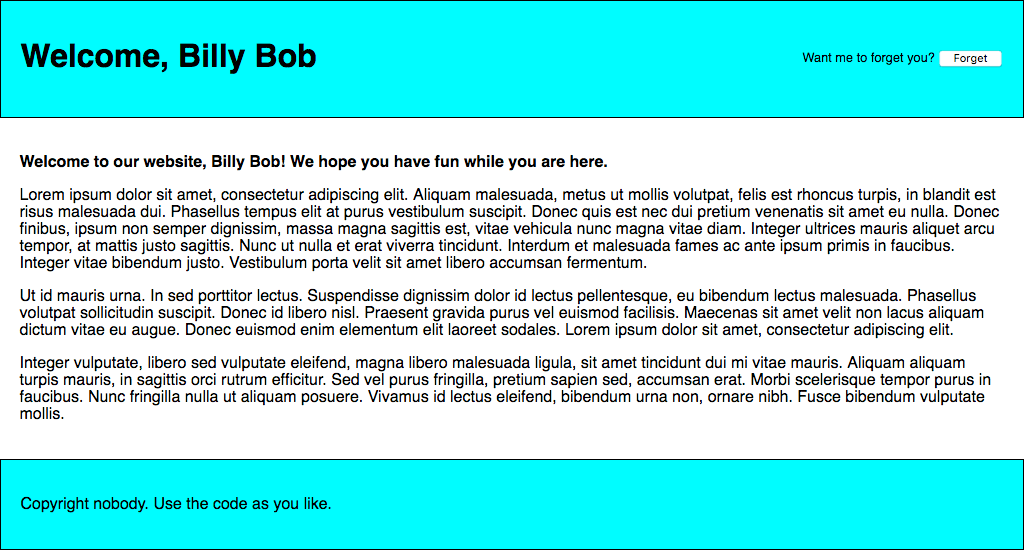
Allow's apply this new-found noesis past writing a working example to give you lot an thought of how spider web storage can be used. Our example will allow yous enter a name, afterward which the folio volition update to give yous a personalized greeting. This state will besides persist across page/browser reloads, because the name is stored in web storage.
You can notice the example HTML at personal-greeting.html — this contains a website with a header, content, and footer, and a form for entering your proper noun.
Let'southward build upwardly the example, so yous tin sympathize how it works.
- First, make a local copy of our personal-greeting.html file in a new directory on your computer.
- Side by side, notation how our HTML references a JavaScript file called
index.js, with a line like<script src="index.js" defer></script>. We need to create this and write our JavaScript code into it. Create analphabetize.jsfile in the same directory equally your HTML file. - We'll start off past creating references to all the HTML features we demand to manipulate in this case — nosotros'll create them all as constants, as these references do not need to change in the lifecycle of the app. Add the following lines to your JavaScript file:
// create needed constants const rememberDiv = certificate. querySelector ( '.remember' ) ; const forgetDiv = document. querySelector ( '.forget' ) ; const form = document. querySelector ( 'form' ) ; const nameInput = document. querySelector ( '#entername' ) ; const submitBtn = document. querySelector ( '#submitname' ) ; const forgetBtn = document. querySelector ( '#forgetname' ) ; const h1 = document. querySelector ( 'h1' ) ; const personalGreeting = document. querySelector ( '.personal-greeting' ) ; - Next upwards, nosotros need to include a small upshot listener to stop the grade from really submitting itself when the submit push is pressed, as this is non the behavior we want. Add this snippet below your previous code:
// Stop the form from submitting when a button is pressed grade. addEventListener ( 'submit' , eastward => e. preventDefault ( ) ) ; - Now we demand to add together an issue listener, the handler role of which will run when the "Say hullo" button is clicked. The comments explain in item what each bit does, but in essence here nosotros are taking the name the user has entered into the text input box and saving it in spider web storage using
setItem(), then running a function callednameDisplayCheck()that will handle updating the actual website text. Add this to the lesser of your code:// run function when the 'Say hello' push is clicked submitBtn. addEventListener ( 'click' , ( ) => { // shop the entered name in web storage localStorage. setItem ( 'proper name' , nameInput.value) ; // run nameDisplayCheck() to sort out displaying the personalized greetings and updating the form display nameDisplayCheck ( ) ; } ) ; - At this point we also need an upshot handler to run a office when the "Forget" button is clicked — this is only displayed after the "Say how-do-you-do" button has been clicked (the two form states toggle back and forth). In this role nosotros remove the
proper nounitem from web storage usingremoveItem(), then again runnameDisplayCheck()to update the brandish. Add this to the bottom:// run function when the 'Forget' push button is clicked forgetBtn. addEventListener ( 'click' , ( ) => { // Remove the stored name from web storage localStorage. removeItem ( 'proper noun' ) ; // run nameDisplayCheck() to sort out displaying the generic greeting again and updating the course display nameDisplayCheck ( ) ; } ) ; - It is now time to define the
nameDisplayCheck()function itself. Here we cheque whether the name item has been stored in web storage past usinglocalStorage.getItem('name')as a conditional test. If the proper noun has been stored, this phone call will evaluate totrue; if non, the call will evaluate tofalse. If the call evaluates totrue, nosotros display a personalized greeting, display the "forget" part of the form, and hibernate the "Say hello" role of the grade. If the phone call evaluates tofalse, nosotros brandish a generic greeting and practice the reverse. Over again, put the following code at the bottom:// define the nameDisplayCheck() role role nameDisplayCheck ( ) { // bank check whether the 'proper noun' data item is stored in spider web Storage if (localStorage. getItem ( 'name' ) ) { // If information technology is, display personalized greeting const name = localStorage. getItem ( 'name' ) ; h1.textContent = ` Welcome, ${name} ` ; personalGreeting.textContent = ` Welcome to our website, ${proper noun} ! We hope you have fun while you are hither. ` ; // hibernate the 'remember' part of the form and testify the 'forget' part forgetDiv.manner.display = 'cake' ; rememberDiv.style.brandish = 'none' ; } else { // if not, brandish generic greeting h1.textContent = 'Welcome to our website ' ; personalGreeting.textContent = 'Welcome to our website. We hope you have fun while you are hither.' ; // hide the 'forget' part of the form and prove the 'remember' part forgetDiv.way.display = 'none' ; rememberDiv.style.display = 'block' ; } } - Last but not least, we need to run the
nameDisplayCheck()role when the folio is loaded. If we don't do this, then the personalized greeting will not persist across page reloads. Add the post-obit to the bottom of your code:
Your case is finished — well done! All that remains at present is to save your code and test your HTML page in a browser. You can run into our finished version running live here.
Note: In the line <script src="index.js" defer></script> of the source for our finished version, the defer aspect specifies that the contents of the <script> element volition not execute until the page has finished loading.
Storing circuitous data — IndexedDB
The IndexedDB API (sometimes abbreviated IDB) is a consummate database arrangement available in the browser in which you can store complex related data, the types of which aren't limited to elementary values similar strings or numbers. You tin can store videos, images, and pretty much annihilation else in an IndexedDB instance.
However, this does come at a toll: IndexedDB is much more complex to utilize than the Web Storage API. In this section, we'll actually only scratch the surface of what it is capable of, but we will requite you enough to get started.
Working through a note storage case
Here we'll run you through an example that allows you to shop notes in your browser and view and delete them whenever you similar, getting you to build it up for yourself and explaining the about fundamental parts of IDB every bit nosotros go on.
The app looks something similar this:
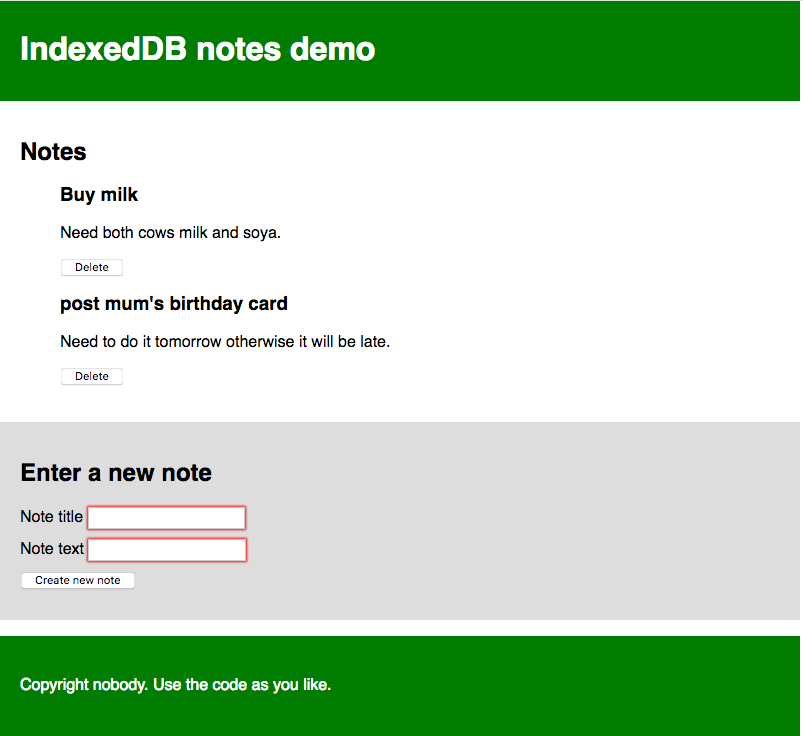
Each note has a championship and some body text, each individually editable. The JavaScript lawmaking we'll go through below has detailed comments to assistance you understand what's going on.
Getting started
- First of all, make local copies of our
alphabetize.html,mode.css, andindex-start.jsfiles into a new directory on your local motorcar. - Have a wait at the files. You'll see that the HTML defines a web site with a header and footer, besides as a main content expanse that contains a place to brandish notes, and a form for entering new notes into the database. The CSS provides some styling to brand it clearer what is going on. The JavaScript file contains five declared constants containing references to the
<ul>element the notes will exist displayed in, the title and body<input>elements, the<form>itself, and the<push button>. - Rename your JavaScript file to
index.js. You are now fix to start calculation code to it.
Database initial set upwardly
Now let's wait at what we have to practise in the first place, to really gear up a database.
- Below the constant declarations, add the post-obit lines: Hither nosotros are declaring a variable chosen
// Create an instance of a db object for us to store the open up database in allow db;db— this volition later be used to shop an object representing our database. We will employ this in a few places, so nosotros've alleged it globally here to brand things easier. - Next, add the following: This line creates a request to open version
// Open our database; it is created if information technology doesn't already be // (see the upgradeneeded handler below) const openRequest = window.indexedDB. open ( 'notes_db' , i ) ;1of a database callednotes_db. If this doesn't already be, it will be created for you by subsequent code. You volition come across this request pattern used very often throughout IndexedDB. Database operations take time. You don't desire to hang the browser while yous expect for the results, so database operations are asynchronous, meaning that instead of happening immediately, they will happen at some betoken in the futurity, and yous become notified when they're done. To handle this in IndexedDB, you lot create a request object (which can be called anything you like — nosotros called itopenRequesthither, so it is obvious what it is for). You then utilize event handlers to run code when the request completes, fails, etc., which you'll encounter in utilize below.Note: The version number is of import. If you desire to upgrade your database (for example, past irresolute the table structure), you take to run your lawmaking again with an increased version number, dissimilar schema specified inside the
upgradeneededhandler (encounter below), etc. Nosotros won't encompass upgrading databases in this tutorial. - Now add together the following issue handlers but beneath your previous addition: The
// fault handler signifies that the database didn't open successfully openRequest. addEventListener ( 'error' , ( ) => console. error ( 'Database failed to open' ) ) ; // success handler signifies that the database opened successfully openRequest. addEventListener ( 'success' , ( ) => { console. log ( 'Database opened successfully' ) ; // Shop the opened database object in the db variable. This is used a lot beneath db = openRequest.result; // Run the displayData() function to display the notes already in the IDB displayData ( ) ; } ) ;faultevent handler will run if the system comes dorsum maxim that the asking failed. This allows you lot to respond to this problem. In our example, nosotros only impress a bulletin to the JavaScript console. Thesuccessconsequence handler volition run if the request returns successfully, meaning the database was successfully opened. If this is the example, an object representing the opened database becomes available in theopenRequest.effectproperty, allowing us to dispense the database. Nosotros store this in thedbvariable we created before for afterwards use. We likewise run a function calleddisplayData(), which displays the data in the database inside the<ul>. We run it at present so that the notes already in the database are displayed as before long as the page loads. You'll seedisplayData()defined later on on. - Finally for this section, we'll add together probably the most of import upshot handler for setting up the database:
upgradeneeded. This handler runs if the database has not already been set upwardly, or if the database is opened with a bigger version number than the existing stored database (when performing an upgrade). Add together the post-obit code, below your previous handler:This is where we define the schema (construction) of our database; that is, the ready of columns (or fields) it contains. Hither nosotros kickoff grab a reference to the existing database from the// Gear up the database tables if this has not already been done openRequest. addEventListener ( 'upgradeneeded' , e => { // Grab a reference to the opened database db = e.target.result; // Create an objectStore to store our notes in (basically like a single table) // including a machine-incrementing primal const objectStore = db. createObjectStore ( 'notes_os' , { keyPath : 'id' , autoIncrement : true } ) ; // Ascertain what data items the objectStore will comprise objectStore. createIndex ( 'title' , 'title' , { unique : simulated } ) ; objectStore. createIndex ( 'torso' , 'body' , { unique : false } ) ; console. log ( 'Database setup consummate' ) ; } ) ;resultholding of the event's target (eastward.target.result), which is therequestobject. This is equivalent to the linedb = openRequest.result;inside thesuccessupshot handler, but nosotros need to practise this separately hither considering theupgradeneededevent handler (if needed) will run earlier thesuccessevent handler, meaning that thedbvalue wouldn't exist bachelor if nosotros didn't do this. Nosotros and so employIDBDatabase.createObjectStore()to create a new object store within our opened database callednotes_os. This is equivalent to a single tabular array in a conventional database system. We've given it the proper name notes, and also specified anautoIncrementcardinal field chosenid— in each new record this will automatically be given an incremented value — the developer doesn't need to fix this explicitly. Beingness the key, theidfield volition be used to uniquely place records, such as when deleting or displaying a record. Nosotros besides create two other indexes (fields) using theIDBObjectStore.createIndex()method:title(which will incorporate a championship for each note), andtorso(which will contain the body text of the notation).
And then with this database schema prepare upward, when we commencement adding records to the database, each one will be represented every bit an object along these lines:
{ title : "Buy milk" , body : "Need both cows milk and soy." , id : 8 } Adding data to the database
Now let'southward look at how we can add records to the database. This will be done using the form on our page.
Beneath your previous consequence handler, add the following line, which sets upwardly a submit consequence handler that runs a function called addData() when the form is submitted (when the submit <button> is pressed leading to a successful form submission):
// Create a submit event handler and so that when the form is submitted the addData() function is run class. addEventListener ( 'submit' , addData) ; Now permit'due south define the addData() function. Add this below your previous line:
// Define the addData() function office addData ( e ) { // forbid default - nosotros don't want the form to submit in the conventional mode e. preventDefault ( ) ; // grab the values entered into the grade fields and store them in an object fix for existence inserted into the DB const newItem = { championship : titleInput.value, body : bodyInput.value } ; // open up a read/write db transaction, ready for adding the information const transaction = db. transaction ( [ 'notes_os' ] , 'readwrite' ) ; // phone call an object store that's already been added to the database const objectStore = transaction. objectStore ( 'notes_os' ) ; // Make a request to add our newItem object to the object store const addRequest = objectStore. add together (newItem) ; addRequest. addEventListener ( 'success' , ( ) => { // Articulate the form, ready for calculation the next entry titleInput.value = '' ; bodyInput.value = '' ; } ) ; // Study on the success of the transaction completing, when everything is done transaction. addEventListener ( 'complete' , ( ) => { console. log ( 'Transaction completed: database modification finished.' ) ; // update the display of data to show the newly added item, by running displayData() again. displayData ( ) ; } ) ; transaction. addEventListener ( 'fault' , ( ) => panel. log ( 'Transaction not opened due to mistake' ) ) ; } This is quite complex; breaking it down, we:
- Run
Event.preventDefault()on the outcome object to stop the form actually submitting in the conventional fashion (this would cause a page refresh and spoil the experience). - Create an object representing a record to enter into the database, populating it with values from the form inputs. Note that we don't take to explicitly include an
idvalue — as we explained earlier, this is motorcar-populated. - Open a
readwritetransaction confronting thenotes_osobject store using theIDBDatabase.transaction()method. This transaction object allows us to admission the object shop so we can exercise something to it, e.k. add a new record. - Access the object store using the
IDBTransaction.objectStore()method, saving the result in theobjectStorevariable. - Add together the new record to the database using
IDBObjectStore.add(). This creates a request object, in the same manner as nosotros've seen earlier. - Add a bunch of event handlers to the
requestand thetransactionobjects to run lawmaking at critical points in the lifecycle. Once the asking has succeeded, we clear the form inputs prepare for entering the next note. In one case the transaction has completed, we run thedisplayData()office again to update the display of notes on the page.
Displaying the data
Nosotros've referenced displayData() twice in our code already, and then nosotros'd probably better define information technology. Add this to your code, below the previous office definition:
// Define the displayData() function function displayData ( ) { // Hither we empty the contents of the listing element each time the display is updated // If you didn't exercise this, you'd go duplicates listed each time a new annotation is added while (listing.firstChild) { list. removeChild (list.firstChild) ; } // Open our object shop and then go a cursor - which iterates through all the // different data items in the shop const objectStore = db. transaction ( 'notes_os' ) . objectStore ( 'notes_os' ) ; objectStore. openCursor ( ) . addEventListener ( 'success' , e => { // Get a reference to the cursor const cursor = e.target.result; // If there is however another data item to iterate through, proceed running this lawmaking if (cursor) { // Create a list item, h3, and p to put each data item inside when displaying it // structure the HTML fragment, and append it inside the listing const listItem = document. createElement ( 'li' ) ; const h3 = document. createElement ( 'h3' ) ; const para = document. createElement ( 'p' ) ; listItem. appendChild (h3) ; listItem. appendChild (para) ; list. appendChild (listItem) ; // Put the information from the cursor inside the h3 and para h3.textContent = cursor.value.title; para.textContent = cursor.value.torso; // Store the ID of the data detail within an attribute on the listItem, and so we know // which item information technology corresponds to. This will be useful later when we want to delete items listItem. setAttribute ( 'data-annotation-id' , cursor.value.id) ; // Create a push and place information technology inside each listItem const deleteBtn = document. createElement ( 'button' ) ; listItem. appendChild (deleteBtn) ; deleteBtn.textContent = 'Delete' ; // Fix an result handler so that when the button is clicked, the deleteItem() // part is run deleteBtn. addEventListener ( 'click' , deleteItem) ; // Iterate to the side by side item in the cursor cursor. continue ( ) ; } else { // Again, if listing item is empty, display a 'No notes stored' bulletin if ( !list.firstChild) { const listItem = document. createElement ( 'li' ) ; listItem.textContent = 'No notes stored.' list. appendChild (listItem) ; } // if there are no more cursor items to iterate through, say so console. log ( 'Notes all displayed' ) ; } } ) ; } Once again, let's suspension this down:
- First nosotros empty out the
<ul>element's content, before then filling it with the updated content. If y'all didn't practice this, yous'd end up with a huge list of duplicated content existence added to with each update. - Adjacent, we get a reference to the
notes_osobject store usingIDBDatabase.transaction()andIDBTransaction.objectStore()like nosotros did inaddData(), except hither nosotros are chaining them together in one line. - The next step is to utilize the
IDBObjectStore.openCursor()method to open a request for a cursor — this is a construct that can be used to iterate over the records in an object store. We concatenation asuccessoutcome handler on to the end of this line to make the code more concise — when the cursor is successfully returned, the handler is run. - Nosotros go a reference to the cursor itself (an
IDBCursorobject) usingconst cursor = e.target.result. - Side by side, we bank check to see if the cursor contains a record from the datastore (
if(cursor){ ... }) — if so, nosotros create a DOM fragment, populate it with the data from the tape, and insert it into the page (inside the<ul>chemical element). We likewise include a delete button that, when clicked, will delete that note past running thedeleteItem()part, which we volition expect at in the next section. - At the end of the
ifblock, we employ theIDBCursor.continue()method to accelerate the cursor to the side by side record in the datastore, and run the content of theifblock once more. If in that location is another record to iterate to, this causes it to be inserted into the page, and socontinue()is run again, and and then on. - When in that location are no more records to iterate over,
cursorwill returnundefined, and therefore theelseblock volition run instead of theifcake. This cake checks whether any notes were inserted into the<ul>— if non, it inserts a bulletin to say no note was stored.
Deleting a annotation
Every bit stated above, when a note's delete button is pressed, the notation is deleted. This is achieved by the deleteItem() function, which looks like then:
// Ascertain the deleteItem() part function deleteItem ( e ) { // retrieve the proper noun of the chore we desire to delete. We need // to convert it to a number earlier trying to use it with IDB; IDB primal // values are type-sensitive. const noteId = Number (e.target.parentNode. getAttribute ( 'data-note-id' ) ) ; // open a database transaction and delete the chore, finding it using the id we retrieved higher up const transaction = db. transaction ( [ 'notes_os' ] , 'readwrite' ) ; const objectStore = transaction. objectStore ( 'notes_os' ) ; const deleteRequest = objectStore. delete (noteId) ; // study that the information item has been deleted transaction. addEventListener ( 'complete' , ( ) => { // delete the parent of the push button // which is the list item, so information technology is no longer displayed e.target.parentNode.parentNode. removeChild (east.target.parentNode) ; console. log ( ` Note ${noteId} deleted. ` ) ; // Again, if list item is empty, display a 'No notes stored' bulletin if ( !list.firstChild) { const listItem = certificate. createElement ( 'li' ) ; listItem.textContent = 'No notes stored.' ; listing. appendChild (listItem) ; } } ) ; } - The first part of this could utilise some explaining — nosotros retrieve the ID of the record to be deleted using
Number(e.target.parentNode.getAttribute('data-note-id'))— recall that the ID of the record was saved in adata-note-idattribute on the<li>when it was first displayed. We practise yet need to pass the aspect through the global built-inNumber()object as it is of datatype string, and therefore wouldn't be recognized by the database, which expects a number. - We then become a reference to the object store using the aforementioned design we've seen previously, and apply the
IDBObjectStore.delete()method to delete the record from the database, passing it the ID. - When the database transaction is complete, we delete the note's
<li>from the DOM, and once more do the cheque to come across if the<ul>is now empty, inserting a notation as appropriate.
Then that'south it! Your example should now work.
If you are having trouble with it, experience gratuitous to bank check information technology against our alive example (see the source lawmaking also).
Storing complex information via IndexedDB
As we mentioned above, IndexedDB can be used to shop more than than just text strings. Y'all tin store just virtually annihilation you want, including complex objects such as video or image blobs. And information technology isn't much more than difficult to achieve than any other type of data.
To demonstrate how to do it, we've written another instance called IndexedDB video shop (see it running live here too). When y'all first run the example, information technology downloads all the videos from the network, stores them in an IndexedDB database, and so displays the videos in the UI within <video> elements. The 2d time you run it, it finds the videos in the database and gets them from in that location instead before displaying them — this makes subsequent loads much quicker and less bandwidth-hungry.
Let's walk through the most interesting parts of the example. We won't look at information technology all — a lot of information technology is similar to the previous case, and the code is well-commented.
- For this example, we've stored the names of the videos to fetch in an assortment of objects:
const videos = [ { 'name' : 'crystal' } , { 'proper name' : 'elf' } , { 'name' : 'frog' } , { 'proper noun' : 'monster' } , { 'name' : 'grunter' } , { 'proper noun' : 'rabbit' } ] ; - To starting time with, once the database is successfully opened we run an
init()role. This loops through the different video names, trying to load a record identified by each name from thevideosdatabase. If each video is found in the database (checked by seeing whetherrequest.resultevaluates totrue— if the record is not present, it will existundefined), its video files (stored as blobs) and the video proper name are passed straight to thedisplayVideo()function to place them in the UI. If not, the video name is passed to thefetchVideoFromNetwork()part to ... you lot guessed it — fetch the video from the network.function init ( ) { // Loop through the video names one past one for ( const video of videos) { // Open transaction, become object store, and get() each video past name const objectStore = db. transaction ( 'videos_os' ) . objectStore ( 'videos_os' ) ; const request = objectStore. get (video.proper name) ; asking. addEventListener ( 'success' , ( ) => { // If the result exists in the database (is not undefined) if (request.upshot) { // Grab the videos from IDB and display them using displayVideo() panel. log ( 'taking videos from IDB' ) ; displayVideo (request.issue.mp4, request.result.webm, asking.result.name) ; } else { // Fetch the videos from the network fetchVideoFromNetwork (video) ; } } ) ; } } - The post-obit snippet is taken from inside
fetchVideoFromNetwork()— here we fetch MP4 and WebM versions of the video using ii disseverfetch()requests. We then employ theResponse.hulk()method to excerpt each response'south torso as a hulk, giving united states of america an object representation of the videos that tin can be stored and displayed later on. Nosotros have a problem here though — these 2 requests are both asynchronous, but we only want to try to brandish or store the video when both promises take fulfilled. Fortunately there is a built-in method that handles such a problem —Promise.all(). This takes ane argument — references to all the private promises you want to cheque for fulfillment placed in an array — and returns a hope which is fulfilled when all the individual promises are fulfilled. Inside thethen()handler for this promise, we call thedisplayVideo()function like nosotros did earlier to display the videos in the UI, then we also call thestoreVideo()function to store those videos inside the database.// Fetch the MP4 and WebM versions of the video using the fetch() function, // then expose their response bodies as blobs const mp4Blob = fetch ( ` videos/ ${video.name} .mp4 ` ) . so ( response => response. blob ( ) ) ; const webmBlob = fetch ( ` videos/ ${video.name} .mp4 ` ) . and so ( response => response. blob ( ) ) ; // Only run the side by side code when both promises have fulfilled Promise. all ( [mp4Blob, webmBlob] ) . and so ( values => { // display the video fetched from the network with displayVideo() displayVideo (values[ 0 ] , values[ 1 ] , video.name) ; // store it in the IDB using storeVideo() storeVideo (values[ 0 ] , values[ 1 ] , video.proper noun) ; } ) ; - Allow'south look at
storeVideo()first. This is very similar to the pattern you saw in the previous case for adding information to the database — we open areadwritetransaction and get a reference to ourvideos_osobject store, create an object representing the tape to add to the database, then add it usingIDBObjectStore.add().// Define the storeVideo() function role storeVideo ( mp4Blob, webmBlob, name ) { // Open transaction, get object store; make it a readwrite then nosotros can write to the IDB const objectStore = db. transaction ( [ 'videos_os' ] , 'readwrite' ) . objectStore ( 'videos_os' ) ; // Create a record to add together to the IDB const tape = { mp4 : mp4Blob, webm : webmBlob, name : proper name } // Add the record to the IDB using add together() const request = objectStore. add together (record) ; asking. addEventListener ( 'success' , ( ) => console. log ( 'Record addition attempt finished' ) ) ; asking. addEventListener ( 'fault' , ( ) => console. error (request.error) ) ; } - Finally, we have
displayVideo(), which creates the DOM elements needed to insert the video in the UI and and then appends them to the page. The near interesting parts of this are those shown below — to actually display our video blobs in a<video>element, we demand to create object URLs (internal URLs that betoken to the video blobs stored in retention) using theURL.createObjectURL()method. One time that is done, nosotros can set the object URLs to be the values of our<source>element'southwardsrcattributes, and it works fine.// Define the displayVideo() function part displayVideo ( mp4Blob, webmBlob, title ) { // Create object URLs out of the blobs const mp4URL = URL . createObjectURL (mp4Blob) ; const webmURL = URL . createObjectURL (webmBlob) ; // Create DOM elements to embed video in the page const article = document. createElement ( 'article' ) ; const h2 = document. createElement ( 'h2' ) ; h2.textContent = title; const video = document. createElement ( 'video' ) ; video.controls = true ; const source1 = document. createElement ( 'source' ) ; source1.src = mp4URL; source1.blazon = 'video/mp4' ; const source2 = document. createElement ( 'source' ) ; source2.src = webmURL; source2.type = 'video/webm' ; // Embed DOM elements into folio section. appendChild (article) ; article. appendChild (h2) ; article. appendChild (video) ; video. appendChild (source1) ; video. appendChild (source2) ; }
Offline asset storage
The higher up example already shows how to create an app that will shop large assets in an IndexedDB database, fugitive the demand to download them more than once. This is already a great improvement to the user feel, but there is still one thing missing — the principal HTML, CSS, and JavaScript files still demand to be downloaded each time the site is accessed, significant that it won't work when there is no network connection.
This is where Service workers and the closely-related Cache API come up in.
A service worker is a JavaScript file that is registered against a detail origin (web site, or role of a web site at a sure domain) when it is accessed by a browser. When registered, information technology tin control pages bachelor at that origin. Information technology does this by sitting between a loaded page and the network and intercepting network requests aimed at that origin.
When it intercepts a asking, it can do anything you wish to information technology (run into use case ideas), just the classic instance is saving the network responses offline and then providing those in response to a request instead of the responses from the network. In effect, it allows you lot to make a spider web site work completely offline.
The Cache API is another customer-side storage mechanism, with a flake of a difference — it is designed to relieve HTTP responses, and then works very well with service workers.
A service worker instance
Allow's look at an case, to requite you a bit of an idea of what this might look similar. We have created some other version of the video store example we saw in the previous section — this functions identically, except that it also saves the HTML, CSS, and JavaScript in the Cache API via a service worker, allowing the case to run offline!
Meet IndexedDB video shop with service worker running live, and too come across the source lawmaking.
Registering the service worker
The first matter to note is that in that location's an extra scrap of code placed in the main JavaScript file (see alphabetize.js). First nosotros do a feature detection exam to see if the serviceWorker fellow member is available in the Navigator object. If this returns true, then nosotros know that at least the basics of service workers are supported. Inside here we use the ServiceWorkerContainer.register() method to register a service worker independent in the sw.js file against the origin it resides at, and so it can command pages in the aforementioned directory as it, or subdirectories. When its promise fulfills, the service worker is accounted registered.
// Annals service worker to command making site work offline if ( 'serviceWorker' in navigator) { navigator.serviceWorker . register ( '/learning-area/javascript/apis/client-side-storage/cache-sw/video-store-offline/sw.js' ) . so ( ( ) => console. log ( 'Service Worker Registered' ) ) ; } Note: The given path to the sw.js file is relative to the site origin, not the JavaScript file that contains the code. The service worker is at https://mdn.github.io/learning-expanse/javascript/apis/customer-side-storage/enshroud-sw/video-store-offline/sw.js. The origin is https://mdn.github.io, and therefore the given path has to be /learning-expanse/javascript/apis/client-side-storage/cache-sw/video-store-offline/sw.js. If y'all wanted to host this example on your own server, y'all'd have to change this accordingly. This is rather confusing, but it has to work this fashion for security reasons.
Installing the service worker
The next fourth dimension whatsoever folio nether the service worker's command is accessed (e.g. when the case is reloaded), the service worker is installed against that page, significant that it will starting time controlling information technology. When this occurs, an install event is fired against the service worker; you tin write code inside the service worker itself that volition respond to the installation.
Let's expect at an case, in the sw.js file (the service worker). You'll see that the install listener is registered against cocky. This self keyword is a way to refer to the global scope of the service worker from inside the service worker file.
Inside the install handler we use the ExtendableEvent.waitUntil() method, available on the event object, to betoken that the browser shouldn't complete installation of the service worker until after the promise inside information technology has fulfilled successfully.
Hither is where we see the Enshroud API in action. We use the CacheStorage.open() method to open a new cache object in which responses can be stored (like to an IndexedDB object shop). This promise fulfills with a Cache object representing the video-store enshroud. We then use the Cache.addAll() method to fetch a series of avails and add their responses to the cache.
self. addEventListener ( 'install' , e => { e. waitUntil ( caches. open ( 'video-shop' ) . then ( enshroud => { return cache. addAll ( [ '/learning-surface area/javascript/apis/client-side-storage/cache-sw/video-store-offline/' , '/learning-surface area/javascript/apis/client-side-storage/cache-sw/video-store-offline/index.html' , '/learning-surface area/javascript/apis/client-side-storage/cache-sw/video-shop-offline/index.js' , '/learning-area/javascript/apis/client-side-storage/cache-sw/video-store-offline/fashion.css' ] ) ; } ) ) ; } ) ; That's information technology for at present, installation washed.
Responding to further requests
With the service worker registered and installed against our HTML folio, and the relevant assets all added to our cache, nosotros are almost ready to go. At that place is simply one more thing to do: write some code to respond to further network requests.
This is what the 2d bit of code in sw.js does. Nosotros add together another listener to the service worker global telescopic, which runs the handler function when the fetch event is raised. This happens whenever the browser makes a request for an asset in the directory the service worker is registered against.
Inside the handler nosotros first log the URL of the requested asset. Nosotros then provide a custom response to the asking, using the FetchEvent.respondWith() method.
Inside this block we utilize CacheStorage.match() to check whether a matching request (i.due east. matches the URL) can exist found in any enshroud. This hope fulfills with the matching response if a lucifer is found, or undefined if it isn't.
If a friction match is found, we return it as the custom response. If not, we fetch() the response from the network and render that instead.
self. addEventListener ( 'fetch' , e => { console. log (e.request.url) ; e. respondWith ( caches. match (east.request) . then ( response => response || fetch (e.asking) ) ) ; } ) ; And that is information technology for our service worker. At that place is a whole load more you can do with them — for a lot more detail, run into the service worker cookbook. Many thanks to Paul Kinlan for his article Calculation a Service Worker and Offline into your Web App, which inspired this example.
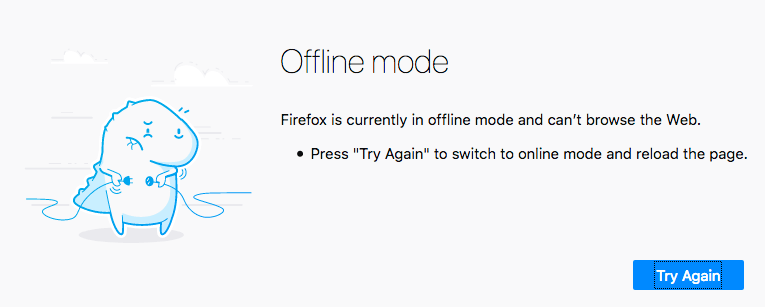
Testing the example offline
To examination our service worker example, you'll need to load information technology a couple of times to make certain information technology is installed. Once this is washed, yous can:
- Try unplugging your network/turning your Wi-Fi off.
- Select File > Work Offline if you are using Firefox.
- Go to the devtools, and then cull Awarding > Service Workers, then check the Offline checkbox if you are using Chrome.
If you refresh your instance page again, you should still encounter it load just fine. Everything is stored offline — the folio assets in a enshroud, and the videos in an IndexedDB database.
Summary
That'due south it for now. We promise you've plant our rundown of client-side storage technologies useful.
Meet also
In this module
Source: https://developer.mozilla.org/en-US/docs/Learn/JavaScript/Client-side_web_APIs/Client-side_storage
Post a Comment for "How to Load Java Script Again in Footer"